Creating CI/CD Pipelines in gitlab
8 minutes to read
 /
/
The goal: create a repository that is built (and tested) and deployed by a machine directly on server. We will call the machine CI/CD machine which stands for continuous integration / continuous deployment. We aim to automatize the difficult steps of testing and deploying our application upon every change or more exactly upon every git branch merge.
The machine is provided for free by gitlab.com and is called Gitlab CI/CD.
The idea is the machine will be able to fetch a docker container and virtually build inside it our site. There the site can be tested and changed by running our favorite command lines tools, linters or automated tests. That is the build phase.
The second phase is the deployment stage. Here the machine will deploy our site, including our latest changes directly on our server.
For this step the machine will need a safe way to get authenticated on our server. The option we pick here is through ssh and asymetrical keys.
For this reason we use or better generate a set of keys for this purpose. The key set consists in a private key (to be kept securely) and a public key (derived from the private key). Our target server, let’s call it larry needs to have the public key in its authorized key list. When comparing our key with the key stored there they must be perfect identically.
So first step:
Generating SSH key pair
We first generate the key on our local (development) machine:
Leave the passphrase blank. Again, please do not enter any passphrase as this will complicate the deployment script.
ssh-keygen -t ed25519 -C "keys steve"
This will produce a set of keys as follows, where the public key has the file extension .pub. This public key you can share with any server where you want to deploy your project. It’s safe.
$ ls ~/.ssh
id_ed25519  id_ed25519.pub
Now, you can copy the key to larry server (me it’s your username of that server, assuming you are not such a fool to connect as root):
ssh-copy-id me@larry
Now, if you are scratching your forehead thinking what your computer understands by larry, it’s /etc/hosts that keeps the references between your server IP and a whatever name, in our case larry.
$ cat /etc/hosts

127.0.0.1   localhost
127.0.1.1   xoxo
132.109.191.127 larry
Now connect to your server:
ssh me@larry
If the server doesn’t ask you any password it means you are correctly executed this step.
#Make your gitlab authenticate as your host machine does
This step is necessary because your repository will be kept on your gitlab website.
Needless to say you need an account on that site and a repository of your current project.
In the settings page of your project page that is https://gitlab.com/your-account/your-project/-/settings/ci_cd add the needed variables for connection to larry:
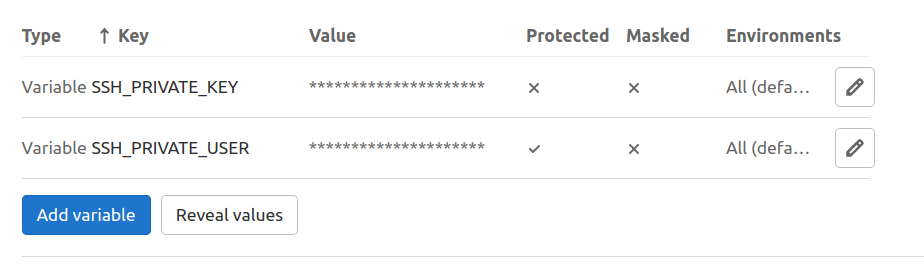
I decided to name it SSH_PRIVATE_KEY and there I store my generated private key.
Now, using my previous way to connect to larry github will be able to connect and deploy my project the same way as my host machine does.
Creating the deployment stages
My current project contains initially only two files. Being a Drupal distro upon I build my site I only need:
composer.json
composer.lock
docker-compose.yml
Additionally I add .gitlab-ci.yml where I will add my integration build stage and deployment deploy stage.
For simplification I first only add the build stage.
Here I will introduce the concept of pipelines. A pipeline is composed of independent jobs that run scripts, grouped into stages. Stages run in sequential order, but jobs within stages run in parallel.
List of stages for jobs, and their order of execution must be declare in the header of the .gitlab-ci.yml file. This file lives in your project root.
Being a yml file the correct indentation is crucial.
stages:
  - build
  #- test
  #- deploy


# This job runs in the build stage, which runs first.
build-job:
  stage: build
  image: tetraweb/php:7.1


  before_script:
   - apt-get update

    #install additional gd extension, that is required by Drupal
   - apt-get install libpng-dev -y
    #official Docker image, some docker-php-ext-* commands are prepared for users to install extensions easily on the  containers
   - docker-php-ext-install  gd
    #install composer
   - apt-get install zip unzip
   - php -r "copy('https://getcomposer.org/installer', 'composer-setup.php');"
   - php composer-setup.php
   - php -r "unlink('composer-setup.php');"

   #install composer package to run parallel tasks
   - composer -n global require -n "hirak/prestissimo"


  script:
    - php composer.phar install
    - echo "Composer complete..."

    #remove unnecessary files
    - rm -rf .git

  artifacts:
    name: "test_project_{CI_COMMIT_SHA}"
    expire_in: '1 week'
    paths:
     - ./

  only:
     - main

  # if you don't want to run immediately the pipeline use this directive
  #when: manual
The artifacts are the project files after the build that will be exposed after the build stage to be downloaded.
Of course later you can add a test stage and a deploy stage.
Now you can run this stage by git commiting this file. The pipeline triggers everytime you git push from your local or you git commit directly in your gitlab project account.
If the pipeline goes green proceed to the next step.
The deployment stage.
As said earlier for this stage you need to be sure the keys are set and ready.
Uncomment the deploy stage as follows:
stages:
  - build
  - deploy
Now go add to the previous file the next piece of code
deploy_job:
  stage: deploy
  environment:
    name: dev
  only:
    - main
  image: tetraweb/php:7.1
  before_script:
    #install ssh agent
    - 'which ssh-agent || ( apt-get update -y && apt-get install openssh-client -y )'
    - mkdir -p ~/.ssh
    - eval $(ssh-agent -s)
    - '[[ -f /.dockerenv ]] && echo -e "Host *\n\tStrictHostKeyChecking no\n\n" > ~/.ssh/config'

  script:
   #- ssh-add <(echo "$SSH_PRIVATE_KEY" | base64 --decode)
   - echo "$SSH_PRIVATE_KEY" | tr -d '\r' | ssh-add - > /dev/null
   - ssh -p22 -oStrictHostKeyChecking=no me@132.109.191.127
I had to add the real IP instead its nickname since here inside the docker container there is not /etc/hosts file. No big deal.
There are several ways to add the key to the ssh agent therefore i keep in comment some alternatives. One problem I experimented was the connection failures due first to a pre-existing passphrase in the private keys which later I remove it for simplification. The gitlab documentation recommends to have a private key without passphrase. If you insiste to have it then read this article here. The second problem I faced was another authentication failure due to blank spaced or faulty carriage return. In order to prune my keys of invisible faulty characters I used tr -d '\r' command.
There is a handy website to ready cryptic linux commands here.
Now assemble and run your two stages of the pipeline. You should pass with green marks. Or maybe not?